Simplified MEF Export Provider using MEF Property Exports
Posted: November 17, 2013 Filed under: Uncategorized Leave a commentPlease read my latest article at my blog’s new home:
http://johngilliland.net
New Blog Home
Posted: October 30, 2013 Filed under: Uncategorized Leave a commentI have finally been able to repurchase my domain after losing it many years ago. So I have migrated this blog, which has been here for 6 years now, back to:
http://johngilliland.net
Test Driven Development in Python
Posted: September 15, 2013 Filed under: Programming, Project Euler | Tags: Python, TDD, unit testing 1 CommentTDD is a mindset
Test driven development is a way of designing as much as it is a way of developing. I have been trying to use it on and off for a several years now without much success. I think I understand the process, but not necessarily the mindset. So, I am taking on a challenge in hopes of learning the mindset as well as the process. The transition to TDD is going to take practice and I intend to get that practice using the Project Euler problems that I started on a couple of years ago. One of the added benefits of using the Euler problems is that they are simple enough usually (or I should say, “So far”) that they can be solved using a single class or even a single method. This makes writing tests for the design a little more direct and therefore simpler.
I have decided to use Python, for now. Python is a simple language to use because it is interpreted rather than compiled. I am also taking this opportunity to learn to use VIM a little better. I have setup VIM as my python ide, and am pretty happy with it so far. And when I am away from my main machine I can use my Koding virtual machine to work on a problem, but that is another post. Plus I have always wanted to know more python, and so far I am really enjoying using it, it was super easy to get up and running with TDD. Writing a unit test in python is very easy, as you will see. So, despite the fact that I write C# all day everyday at work, I am trying to use an easier setup to get some practice in with Test Driven Development.
The Problem
I am currently on problem number 6 at Project Euler, which is title: Sum Square Difference. The statement of the problem is this:
The sum of the squares of the first ten natural numbers is,
12 + 22 + … + 102 = 385The square of the sum of the first ten natural numbers is,
(1 + 2 + … + 10)2 = 552 = 3025Hence the difference between the sum of the squares of the first ten natural numbers and the square of the sum is 3025
385 = 2640.
Find the difference between the sum of the squares of the first one hundred natural numbers and the square of the sum.
This led me to do some research. The past couple of problems I have tackled with more of a brute-force tack and so I decided that this time I would do some research first. I knew there were some formulas that could help me with this one. I basically needed a formula for the following:
- The sum of the squares for 1..n
- The square of the sums of 1..n
With formulas for these two tasks I could then simply diff the result for my answer. I have sample values from the problem statement to use in my unit tests of the formulas. Here are the formulas I will use in solving the problem, both were readily available through Google or Wikipedia searches.

Sum of Integers

Sum of Squares Identity
The Test Class (and the first test)
With test driven development, rather than writing some code for the problem first, of course I need to write a test. So what test? Well I look at the problem and see that I need to find the difference between the sum of the squares of a list of numbers and the square of the sum of those numbers. Therefore I will need to be able to get those values. My first test will be for a correct sum of squares value (the second formula above).
I know that I am supposed to dive right in and write a test for a method that does what I need. This is where you actually do some designing as well. I wrote the following test as the first code for this problem:

Test for a sum of squares method
And here is the output for that test:

Output from run of first test.
As you can see the test failed with an ‘ImportError: No module named Problem6’. That is because I need to add a module for Problem6, which is a new file named Problem6.py. In order to maintain the strict tenets of test driven development I need to only to the minimum required to get past this error. So I will add a new file/module named Problem6.py, and then re-run the test. Here is the output from the next run:

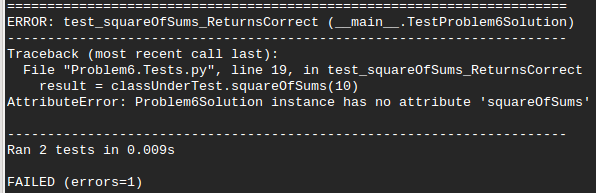
Output from 2nd test run
Now we failed with an AttributeError: ‘module’ object has no attribute ‘Problem6Solution’ and this is because the new module we just added is empty and has no class. So, I will add a class to the module and name it ‘Problem6Solution’ and a method named sumOfSquares that accepts an input number. This should be enough to get through this error. Here is the first look at the solution class:

Solution Class
Now we can run the test again and see what we get this time. It should be an assertion error because we are not yet performing the formula calculation. Here is the result:

Result from pass 3 of test 1
Ah, there is my assertion error. Now I am finally ready to add some code to execute the formula and hopefully pass the test. The formula is simple but as I am a bit of a noobie with python I looked up the math.pow method to help me execute the power calls. Here is the code for the sumOfSquares method complete:

Test1 – Passing!
Repeat for Remaining Tests
The rest of the process is a little smoother in that now we have our classes and files and beginnings completed. We have a passing test and are under way! The next test will be for another piece of our solution’s puzzle, the square of sums formula, where we sum 1..n and then square the result. We have the formula for summing 1..n so it should be fairly simple. Let us see what the test looks like:

Test 2 for a square of sums method
Of course we will run the test without writing any new code to see it fail. Then we will refactor until it passes. I am seeing though, at this point that in writing a test first I am letting the desired output dictate the design of the class. I am starting with what I need and only writing the minimum code in order to get it. Resulting in a fairly concise bit of coding. I am still only utilizing this at a very simple level, but I can see the benefits none the less. What follows if the test result and the code written to make it pass:
Output from Test 2

Square of Sums method
And now our test 2 passes.
Test 2 – Passing!
For the last test, where we test a solve method that takes the difference of our two sums, I will show the resulting classes in their entirety. You will notice there will now be a third test and a third method in the solution class, called ‘solve’.

The complete test class

Complete solution class
Summary
I have added a main method at the end of the solution class that actually shows the answer and the elapsed time to calculate it. That, in my mind, makes this a complete solution that does provide the output desired. And, thanks to Test Driven Development, without anything extra. Of course I could further refactor the formula methods to shorten them, specifically using the sum() method rather than the += operator. However, I have left the code the way it is because I feel it is more readable this way. And in my book, readability counts for something.
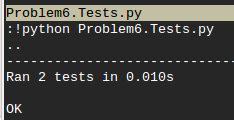
Lastly here is the output, both the passing tests and the printed answer!

All Tests Passing!

Results!
Project euler – again
Posted: August 31, 2013 Filed under: Programming, Project Euler | Tags: Python, TDD, unit testing 1 CommentI am back working on Project Euler again. It has been a great long while, maybe 4 or 5 years, not sure, since I started on it originally, using ruby. Now I am using a mixture, starting for Python for a bit, and possibly switching back to ruby. I say that after solving this last problem (#4) and then going thru some of the other folks solutions, the most elegant usually are the ruby ones, in my humble opinion.
There are of course smaller, or rather more concise, ones but they are too cryptic. Solutions is in statistical languages such as J or K are frightfully illegible. I have to share, just for kicks. First, the problem was to find the largest numeric palindrome that is the product of two 3-digit numbers. Similar to 9009 being the largest that is the product of two 2-digit numbers, 99 and 91. So just for giggles, here are a couple of super concise (and un-readable INHO) solutions:
1. This is in J (http://www.jsoftware.com)
1: >([:{: ]#~ (=|.&.>)) <@":"0 /:~(0:-.~[:,>:/**/)~(i.100)-.~i.1000
and
2. This one is in K (http://www.kx.com/developers/documentationkdb.php)
1: |/m@&{x~|x}'10_vs'm:*/',/n,/:\:n:100+!900
Please realize that I am in awe of the guys that posted these solutions and maybe someday I will be able to learn a language such as one of these, but for now…
I am going to stick to C# and Javascript, and Ruby and Python. They are sufficient to accomplish the tasks I perform on a daily basis at work. I am just learning Python again and also planning to brush up on Ruby. I spent a year or so messing with ruby and ruby on rails, but only at home in my spare time so naturally I didn’t get super far.
So, to the issue at hand. How to find the largest numeric palindrome that is a product of two 3-digit numbers. And, for me, more importantly how do I do this in Python using Test-Driven-Development, only using VIM as my development environment. Pow! Throw that one in there at the last minute. Ha, Ha! Vim super rocks and I am learning more and more about how to mack it out and make it easier to use. Death to my mouse!
Vim setup
I decide to use VIM because I have been really wanting an excuse to get better with it. I use it at work sometimes but when I am in a hurry I end up going back to Notepad++ or SublimeText (which is super nice in its own right, closest thing you can find to Textmate for windows). Anyways I figured this would be a good chance to spend some time with VIM. I am using gVIM by the way on Windows 7 and I have python 2.7 installed as well and in my PATH variable.
I did some research on VIM and found out that I needed to add a ~\_vimrc file with some settings in it. Over the next day or two I slowly acquired a pretty good selection of customizations for VIM that make it much nicer to use. Things like syntax highlighting and default font and color scheme presets. One of the coolest things I figured out from this wonderful article, Turning VIM into a modern Python IDE, which gave me numerous tips, was to use the vertical screen split to show two buffers (files being edited) at once. This allowed me to work on my class in on one side and my unit tests on the other. Like so:

Once I had this setup I was rolling pretty good, really helped with the TDD workflow of:
- Write a test
- See the test fail
- Refactor code to pass test
This was also aided by the VIM settings for executing my scripts using the python command and seeing the output in a new command window. The following additions to my _vimrc file allow me to simply hit ‘F5’ to execute the code in the current buffer. And, conveniently, the *.py filter ensures that it is only set up to do so for Python files. These autocmd lines take advantage of the fact that you can execute any shell command from the VIM command line by prepending it with the ‘!’ character. The last setting maps the ‘F5’ key to the command output of “python “ + the current filename (represented by the ‘%’ output placeholder). Super convenient.

The settings file allowed me to correct the weird backspace key behavior that VIM was displaying. I couldn’t be more pleased, VIM is seemingly endlessly configurable.
The Problem
The goal was to find the correct answer to the 4th problem on Project Euler which is to find the largest numeric palindrome that is a product of two 3-digit numbers. After a bit of thought I decided to start at 999 and work down with any loop I would use, that way I would get to the solution faster than if I started at 100 and went up. But the very first thing I needed to do was to write a test. So I went for an isPalindrome method test, as I knew I would need a test for my products as I iterated through the numbers.
I turns out that there are numerous ways to solve the problem, of course, including using pen and paper and some algebra. I must admit that it never occurred to me to use algebra to solve the problem. Brute force was immediately where my thoughts went and where they stayed. I guess years of coding have taught me that using the simplest and most direct approach is usually the best. There were many interesting solutions posted in the forum for the problem though, and I encourage everyone to check out the many different bits of code there, but only after you solve the problem yourself.
TDD
Before I could write a test I had to figure out exactly how unit testing worked with python, so I did some research and came up with what I would guess is the most direct solution. There is an included unit test module called, unittest and so it was there I began. No configuration necessary, only the use of the very sweet vertical split screen in VIM, so I could look at my tests and my code as I wrote them both.
My first code that I wrote was a class that derived from the base unittest.TestCase class and I named it TestProblem4Solution. I then did a little setup, a valid palindrome value and an invalid palindrome value that I figured I would need in my tests of an isPalindrome method. Then straight to my first test, which was:
1: def test_isPalindrome_ReturnsFalse(self):
2: result = self.cut.isNumericPalindrome(self.invalid_palindrome)
3: self.assertFalse(result)
Naturally this test failed when I ran it, so I had some code to write in my Problem4Solution class, which I needed to create as well. Here is a shot of what I ended up with for making the first test pass:

This was enough to make my second test pass as well, test_isPalindrome_ReturnsTrue which is just a positive result test to go with the first one which tested the negative result.
Moving on to some product work, I knew I would want to test products that were produced from a loop, so I wrote a test called test_highestPalindromeProduct_ReturnsCorrect that would test a method that would take a starting number and multiply it by a set of numbers beginning with itself and stepping down by –1 until a palindrome product was found. Of course there was no such method so the test failed and I was back to my solution class to fix the problem. The resulting method, after a few tweaks and quick trips to the python online docs came out looking like this:

I then added a test for a solve method that I figured would use the two helper methods and find my solution. But, before I finished that I realized that I might want to solve this problem for multiple length numbers. The sample given in the problem was for tow 2-digit numbers and the challenge was for two 3-digit numbers so right off I needed to handle multiple length start numbers (I was using the two 2-digit as test values because I already had the correct answer). Therefore I stepped back and wrote a test for a buildStartNumber method that would take a length up to 5 and return the highest number of that length. I wanted to get back 999 for an input of 3. Here is that test:
1: def test_buildStartNumber_ReturnsCorrectNumber(self):
2: result = self.cut.buildStartNumber(3)
3: self.assertEqual(self.expectedStartNumber, result)
Again, fairly straight forward, I am just testing a result produced by calling the method. The expected value is hanging off of the class instance (self.expectedStartNumber) and is 999 which is what I wanted back. The assertEqual test statement just checks that value against the actual result.
The method to make this test pass was the simplest one in the solution, but only because I did some Googling first to learn some more about what python is capable of…
1: def buildStartNumber(self, length):
2: start = ''.join("9" for x in range(length))
3: return int(start)
You can see that I am using the join function to join the “9” string together for x times in a range of the provided length. The range function is very handy.
That brought me to the solve method which would get me my answer. I first wrote a test that used the known example solution for two 2-digit numbers which is 99 * 91 = 9009. These values ensured that my solve method produced correct results. Sort of! I did get an incorrect answer the first time because I had assumed that if I counted down instead of up the first solution I came to would be the correct one but it wasn’t. I had to store the results and continue on down until I found them all and then keep only the highest one. Counting down from 999 and looking for palindrome products you come first to 995 * 583 which is 580085, a palindrome but not the highest palindrome. You have to keep going to get to 993 * 913 which is 906609 and the correct answer. Now, if I had limited my attempts with a bottom end of say 900 then I would have come to the correct answer first, but I didn’t. I let it go all the way down to 100 until it found a result. Oh well, live and learn.
Back to the TDD, the next test looked like this:
1: def test_solve_ReturnsCorrectValue(self):
2: result = self.cut.solve(2)
3: self.assertEqual(self.solution, result)
Another simple test, where the expected value of self.solution (defined in the test setup method) is an array of [99,91,9009] which is the correct answer for two 2-digit numbers, including the product itself. I knew I would want my solve method to provide me all three values for a complete answer, even though technically all I needed was the palindrome itself to submit to the answer page at project euler.
And the code that I added to make the test pass:

This completed the problem. I submitted the solution, which thanks to my handy ‘F5’ key mapping was just a click away after adding a small main() method to the class that would print out the result of the solve method to the screen. The final output looked like this:

And the answer you can see printed out as [993, 913, 906609], nice and neat. The final code is actually shown at the beginning of the post in the screen shot of VIM with the vertical split. You can see both the Problem4Solution class on the left and the TestProblem4Solution class on the right. If you have any questions just post a comment!
Unit Testing ViewModels In Prism Modules
Posted: May 25, 2013 Filed under: C#, Programming, Work | Tags: C#, PRISM, unit testing 1 CommentPRISM + WPF = MVVM
All of my recent projects at work have been WPF applications designed using the Microsoft PRISM framework for composite/modular applications. PRISM provides the ability to modularize our applications into separate UI modules that are decoupled from the main application and they are developed in a separate project and compiled into their own dll. The UI module project has a bootstrapper class (of sorts) that implements the IModule interface, and in doing so, registers its views with a region in the main window. So basically, if the dll is there then the content will show up in the main UI and if it is not, it won’t. This is an over simplification but I am just trying to provide some context for the main issue that I want to post about. Let us look at a simple example, a configuration/settings module. We would have a main region (see the web for more information on Prism Regions) that is likely a tab control with a tab for each major piece of the user interface, i.e. a Reports tab, a Help tab, etc. The settings module would be a separate project and show up in the main window as its own tab. PRISM will only show the settings module/tab if its dll is found in the bin of the application. The settings bootstrapping class tells PRISM that it has views and which region within the main window’s layout to which the view should be linked. Here is some code:
[Module(ModuleName = "SettingsModule")]
[ModuleExport(typeof(SettingsModule), InitializationMode = InitializationMode.WhenAvailable)]
public class SettingsModule : IModule
{
    private readonly IRegionViewRegistry _regionViewRegistry;

    [ImportingConstructor]
    public SettingsModule(IRegionViewRegistry registry)
    {
        _regionViewRegistry = registry;
    }

    public void Initialize()
    {
        _regionViewRegistry.RegisterViewWithRegion(RegionNames.NavigationRegion, typeof(SettingsViewItemControl));
        _regionViewRegistry.RegisterViewWithRegion(RegionNames.MainRegion, typeof(SettingsView));
    }
}
This is a simple implementation of the Microsoft.Practices.Prism.Modularity.IModule interface within PRISM framework. This interface tells PRISM that this is a UI module and should be made available. Note now the SettingsView is registered with the Main Region, which in our MainWindow xaml is a tab control marked as a PRISM region using a special attribute.
Okay, enough background. I think it is safe to assume some familiarity with these topics or else you would not be reading this type of post. I want to just share some experiences I had recently while writing unit tests for my “Settings Module” (the names and code types have been changed to protect the innocent). It has never come easy, thought-process-wise, when I went to write some unit tests for my user interface classes. So, I am posting about that thought process and sharing the resulting unit tests. I realize that I have virtually zero audience for my blog, but on the off chance that some other developers do read this, I would sincerely benefit from any constructive feedback on my process and my unit tests. Unit testing is a big part of my work (as it should be for all developers, right?) and I have been focusing my studies (recently, The Art of Unit Testing 2nd Ed., Roy Osherove) on this area and on the improvement of my unit tests, both in best practices and in code coverage. So…
Solution Structure
My latest feature/task at work was a configuration module (and the service that supports it) for another WPF, touch-first, application, using all of the latest goodies (Entity Framework, MEF, PRISM, .NET 4.5). The requirements indicated that I would have a tabbed user interface with about a half-dozen different tabs, each containing a logical group of application settings that the user should be able to edit. I set up a main settings view that held a tab control and defined a local region so that I could separate each settings tab into its own view/view model pair. This allowed me to maintain consistency with the design of the other UI modules and with our normal best MVVM practices. Each settings tab had a view which contains the xaml for the ui and a view model class that defines the interaction logic for the view. So, for example, the first settings tab would consist of UserManagementSettingsView.xaml and UserManagementSettingsViewModel.cs. Just for some further context the solution/project structure might look like this:

This, of course, is just a sample structure that I just created in an empty/new solution so that I could grab a screen shot of it for this article. I do not want to use actual code/solution from my work as it is all protected by confidentiality and it is all considered a work product that is owned by our clients, not by myself. Don’t want to get myself into any trouble. But, that said, I think that you can get the idea form this sample structure. The Modules.Settings project is laid out like all of the other ui modules that I might make for an application. There are directories for views, view models and controls, with the SettingsModule.cs class in the root of the project. This is the bootstrapper for the module and where the above shown code might live, implementing the IModule interface and tying the various views in the ui module to their respective regions in the layout. In the case of our example “Settings” module I would make a containing view for the modules content that is a tab control and would define a local PRISM region called Settings region. Each of the individual settings views, i.e. ReportSettingsView would then be registered with the SettingsRegion and would consequently show up in the tab control that is defined in SettingsView.xaml. So I would end up with a Settings view that was filled with various settings tabs. All nice and structured.
You might also note there is a ViewModels directory within the module project where all of the ViewModel classes live. Each view has a corresponding view model class, named accordingly. This is typical of the MVVM design pattern that PRISM employs. Each view’s view model contains properties that define any values and/or commands that are used to create the view. So, for instance, in a ReportSettingsView I might want to display settings for Default Printer, Default Paper Size, and other reports related settings. Consequently the ReportSettingsViewModel class would have properties for these values that bind to the xaml in the view and that is how data is displayed. This binding and population of values in the view is fundamental to the MVVM pattern. There is nothing in the view’s code-behind except coded to tie the view model in and a call to InitalizeComponents which creates the views content.
The unit tests that are needed for this type of UI module class library center around the view model classes, not the views. The views themselves have very little code, as I mentioned, only what is needed to set the view model to the right type and to initialize the xaml. All of the unit test fixtures will be matched to view model types, not to the view types. Therefore I will have a unit test project called WpfApplication1.Modules.Settings.Tests that corresponds to this class library and that will contain all of the test fixtures. Here is another shot of the structure for the unit test project for this ui module.

Notice that the structure of the test project matches that of the module’s class library project shown in the previous screenshot. Any test fixture class is located in the same place within that structure, so all of the view model fixtures are in the ViewModels directory the same as the view model classes themselves are. This is a habit I have always had, not sure where I picked it up, that makes it easy to match a test fixture to a class. The employed naming conventions also go to that end, the word Test or Tests is added to the tested unit’s name so that matching tests to units is that much easier.
Notice also, that there are no test fixture classes for the views, and no Views directory within the Test project’s structure. Again, the views are not unit tested. There isn’t really anything to test in them. Just to prove that point, for anyone that may doubt that, here is the code behind for one of our example views:
namespace WpfApplication1.Modules.Settings.Views
{
    /// <summary>
    /// Interaction logic for SettingsView.xaml
    /// </summary>
    public partial class SettingsView
    {
        /// <summary>
        /// Initializes a new instance of the <see cref="SettingsView"/> class.
        /// </summary>
        [ImportingConstructor]
        public SettingsView()
        {
            InitializeComponent();
        }

        /// <summary>
        /// Sets the view model using MEF import.
        /// </summary>
        [Import]
        public SettingsViewModel ViewModel
        {
            set
            {
                this.DataContext = value;
            }
        }
    }
}
You can see that there is nothing to unit test here. Both the constructor and the single write-only property are handled by MEF importing. MEF is used through out the solution to matching views to view models in this fashion. The data context for each view’s binding is imported using MEF Import attribute on the ViewModel property that is setup for each view. This plumbing is part of setting up each view and cannot be overlooked. It is also possible to use Unity Dependency Injection with PRISM and many people do. Also it is possible to use PRISM with MEF for modularity and Unity for dependency injection, together but that is a debate for another time.
Unit Testing the View Models
So when the time comes to unit test my ui modules I previously have dreaded it, not sure why, mainly because it just hasn’t come naturally to me. Usually when writing unit tests for, let us say an application service, it just flows. I am able to easily see what should be tested and fairly easily write the tests. The only issues being making sure that I am able to mock my dependencies easily. But for view models it isn’t as simple. I am never sure just what should be tested and how to test it. So let us look at some examples. First, here is a view model for one of my settings views:
[Export]
[HasSelfValidation]
public class VolumeSettingsViewModel : BaseSettingsViewModel<VolumeSettingsViewModel>
{
    private decimal _macroMinimumFlushVolume;

    private decimal _macroMinimumPrimeVolume;

    private decimal _manifoldMinimumFlushVolume;

    private decimal _microMinimumFlushVolume;

    private decimal _microMinimumPrimeVolume;

    /// <summary>
    /// Initializes a new instance of the <see cref="VolumeSettingsViewModel"/> class.
    /// </summary>
    /// <param name="serviceAggregator">The service aggregator.</param>
    /// <param name="settingsController">The settings controller.</param>
    [ImportingConstructor]
    public VolumeSettingsViewModel(IServiceAggregator serviceAggregator, ISettingsController settingsController)
        : base(serviceAggregator)
    {
        DisplayName = Resources.Properties.Resources.VolumeSettingsView_DisplayName;

        settingsController.RegisterSettingsViewModel(this);

        RegisterProperties();
        Initialize();
    }

    [RangeValidator(typeof(decimal), Constants.MinMacroFlushRange, RangeBoundaryType.Inclusive, Constants.MaxMacroFlushRange,
        RangeBoundaryType.Inclusive, MessageTemplateResourceName = "VolumeView_RangeErrorMessage",
        MessageTemplateResourceType = typeof(Res))]
    public decimal MacroMinimumFlushVolume
    {
        get
        {
            return _macroMinimumFlushVolume;
        }
        set
        {
            if (value.Equals(_macroMinimumFlushVolume))
            {
                return;
            }
            _macroMinimumFlushVolume = value;
            RaisePropertyChanged(() => MacroMinimumFlushVolume);
            IsDirty = true;
        }
    }

    [RangeValidator(typeof(decimal), Constants.MinMacroPrimeRange, RangeBoundaryType.Inclusive, Constants.MaxMacroPrimeRange,
        RangeBoundaryType.Inclusive, MessageTemplateResourceName = "VolumeSettingsView_RangeErrorMessage",
        MessageTemplateResourceType = typeof(Res))]
    public decimal MacroMinimumPrimeVolume
    {
        get
        {
            return _macroMinimumPrimeVolume;
        }
        set
        {
            if (value.Equals(_macroMinimumPrimeVolume))
            {
                return;
            }
            _macroMinimumPrimeVolume = value;
            RaisePropertyChanged(() => MacroMinimumPrimeVolume);
            IsDirty = true;
        }
    }

    [RangeValidator(typeof(decimal), Constants.MinManifoldFlushRange, RangeBoundaryType.Inclusive, Constants.MaxManifoldFlushRange,
        RangeBoundaryType.Inclusive, MessageTemplateResourceName = "VolumeSettingsView_RangeErrorMessage",
        MessageTemplateResourceType = typeof(Res))]
    public decimal ManifoldMinimumFlushVolume
    {
        get
        {
            return _manifoldMinimumFlushVolume;
        }
        set
        {
            if (value.Equals(_manifoldMinimumFlushVolume))
            {
                return;
            }
            _manifoldMinimumFlushVolume = value;
            RaisePropertyChanged(() => ManifoldMinimumFlushVolume);
            IsDirty = true;
        }
    }

    [RangeValidator(typeof(decimal), Constants.MinMicroFlushRange, RangeBoundaryType.Inclusive, Constants.MaxMicroFlushRange,
        RangeBoundaryType.Inclusive, MessageTemplateResourceName = "VolumeSettingsView_RangeErrorMessage",
        MessageTemplateResourceType = typeof(Res))]
    public decimal MicroMinimumFlushVolume
    {
        get
        {
            return _microMinimumFlushVolume;
        }
        set
        {
            if (value.Equals(_microMinimumFlushVolume))
            {
                return;
            }
            _microMinimumFlushVolume = value;
            RaisePropertyChanged(() => MicroMinimumFlushVolume);
            IsDirty = true;
        }
    }

    [RangeValidator(typeof(decimal), Constants.MinMicroPrimeRange, RangeBoundaryType.Inclusive, Constants.MaxMicroPrimeRange,
        RangeBoundaryType.Inclusive, MessageTemplateResourceName = "VolumeSettingsView_RangeErrorMessage",
        MessageTemplateResourceType = typeof(Res))]
    public decimal MicroMinimumPrimeVolume
    {
        get
        {
            return _microMinimumPrimeVolume;
        }
        set
        {
            if (value.Equals(_microMinimumPrimeVolume))
            {
                return;
            }
            _microMinimumPrimeVolume = value;
            RaisePropertyChanged(() => MicroMinimumPrimeVolume);
            IsDirty = true;
        }
    }

    protected override sealed void Initialize()
    {
        base.Initialize();
    }

    protected override sealed void RegisterProperties()
    {
        RegisterProperty(() => MicroMinimumPrimeVolume);
        RegisterProperty(() => MacroMinimumPrimeVolume);
        RegisterProperty(() => MacroMinimumFlushVolume);
        RegisterProperty(() => MicroMinimumFlushVolume);
        RegisterProperty(() => ManifoldMinimumFlushVolume);
    }

    #endregion
}
This is a new view called VolumeSettingsView that allows the user to setup some minimum volume amounts for a dispensing device. I have altered it a little bit in order to simplify and somewhat obscure its real purpose. I did not want to have to completely write a new view and view model so this is from a work project but as I said, I have kind of dumbed it down a bit. But as you can see from the view model code, there are 5 values for the user to edit and they are represented by properties on the view model. There is also some plumbing code in the form of the BaseSettingsViewModel. The base class implements the connection to the service class that provides and stores these values. I will not go into how it all works, but generally speaking it uses reflection to pull setters and getters for both the view model and the target service so that the updating of values to/from the service is done by the base class and can be re-used for all of the settings view models. Pretty sweet. The last method, RegisterProperties is what sets this all up. The lambda expressions passed in are used to reflect the getters and setters so that it can all be automated. Anyways, lets get to some unit tests. I never have seen the need to unit test C# and .NET library code as that is handled by the authors at Microsoft, so no need to exercise the getters and setters for the view model properties, so let us start with the constructor. That is usually my first point of entry when I am starting my unit tests. So,
What does the constructor do? Let us look at the code:
/// <summary>
/// Initializes a new instance of the <see cref="VolumeSettingsViewModel"/> class.
/// </summary>
/// <param name="serviceAggregator">The service aggregator.</param>
/// <param name="settingsController">The settings controller.</param>
[ImportingConstructor]
public VolumeSettingsViewModel(IServiceAggregator serviceAggregator, ISettingsController settingsController)
    : base(serviceAggregator)
{
    DisplayName = Resources.Properties.Resources.PrimeFlushSettingsView_DisplayName;

    settingsController.RegisterSettingsViewModel(this);

    RegisterProperties();
    Initialize();
}
a. First we set a DisplayName property from a resource string. This is a base class property that happens to be the text for the tab item, but it needs to be set, so we can test that.
b. Second, a method on the settings controller class is called to register the view model with the controller. In this particular implementation I used a controller class for the module. I do not always do this, only when necessary.
In this case, because the settings are spread across several views, I needed a place to coordinate the saving and initialization and other things for all of the settings in one place. So, I added a controller. The settings controller handles the save button for all of the settings tabs together. It checks with each one to see if the values have changed and are valid, so that if the user clicks okay on the confirmation dialog, the save can be performed on all settings view models. That is where the register method comes in. Accepting any instance of IBaseSettingsViewModel, it can manage a list of all of them. Without, I might add, any of the individuals knowing about each other. One of the caveats that must be dealt with when using this setup is that due to the loosely coupled views and view models, and due to the fact that they are all imported using MEF, no one class knows about any of the others. There wasn’t anywhere to manage all of the separate view models, hence a controller class. The controller is made aware of the view model only when the view model says “Here I am” by registering. This maintains the loose coupling. I could remove any one of the settings views and its view model and the module would still perform with those that remain. The controller doesn’t care how many view models register with it and will handle them all the same. Similarly, I could add a new settings tab view/viewmodel and as long as it implements the base interface and registers with the controller, then what ever settings values it exposes can become part of the validation and saving process when the user hits the save button.
So now we can write tests for the constructor. We will test that the display name property is set and that the view model registers with the controller. Makes sense to me anyways…
[TestClass]
public class VolumeSettingsViewModelTests
{
    private readonly MockServices _mockServices = new MockServices();

    private readonly Mock<ISettingsController> _mockSettingsController = new Mock<ISettingsController>();

    [TestMethod]
    public void TestVolumeSettingsViewModelConstructorInitializesMembers()
    {
        // Arrangements
        _mockSettingsController.SetupAllProperties();

        // Actions
        var cut = new VolumeSettingsViewModel(_mockServices.Aggregator, _mockSettingsController.Object);

        // Assertions
        Assert.IsNotNull(cut);
        Assert.IsFalse(cut.DisplayName.IsNullOrEmpty());
        _mockSettingsController.Verify(c => c.RegisterSettingsViewModel(cut), Times.Once());
    }
}
A couple of things to note here. The MockServices type is in a separate unit testing common library that holds any custom mocks that are used over multiple unit tests. MockServices is a mock of all of the application services, including a custom event aggregator mock. The other services are mocked using Moq which we use at work for all of our mocking needs. It works well, is easy to use and I can say that I like it very much. I use mocks of the application services layer so much that I wrote a class that collects them all and creates mocks of them all. Each mocked service is exposed in two ways from the MockServices class. First as a property of the mock itself, i.e. _mockServices.DialogServiceMock, which allows me to make setup and verify calls on the mock of IDialogService. Second as the Object needed for the service for use in passing as a parameter to constructors, etc. For example, if I needed a mock of the dialog service to construct a view model in a unit test I could pass in _mockServices.Aggregator.DialogService and that would not pass the mock but rather the .Object property of the mock, which when using Moq is how you get the instance of the type you are mocking.
So we have tested our view model constructor by asserting that it sets a valid string to the DisplayName property and we have tested that it registered itself with the controller by using the Verfiy method on our mock of the controller (line 20). If a verify call is not successful, a MoqException is thrown which fails the test.
2. What else can we test for? What else does this view model do? Well part of the way my settings models work is by registering the properties that are fed by a service, as I explained is accomplished in the BaseSettingViewModel class. So we can test that this has occurred and is working correctly.
a. We need to setup our mock of the target service that feeds these settings values (in this case it happens to be called ConfigurationService).
b. We need to then change the values of the settings on our view model instance, so that we can…
c. Check that the values were updated on the target service successfully.
Here is the code for that unit test:
[TestMethod]
public void TestVolumeSettingsViewModelRegistersPropertiesWithService()
{
// Arrangements
const decimal TestVolumeValue = 20.5M;
_mockServices.ConfigurationServiceMock.SetupProperty(c => c.MacroMinimumFlushVolume);
_mockServices.ConfigurationServiceMock.SetupProperty(c => c.MicroMinimumFlushVolume);
_mockServices.ConfigurationServiceMock.SetupProperty(c => c.ManifoldMinimumFlushVolume);
_mockServices.ConfigurationServiceMock.SetupProperty(c => c.MacroMinimumPrimeVolume);
_mockServices.ConfigurationServiceMock.SetupProperty(c => c.MicroMinimumPrimeVolume);
_mockServices.Aggregator.ConfigurationService.MacroMinimumFlushVolume = 0;
_mockServices.Aggregator.ConfigurationService.MicroMinimumFlushVolume = 0;
_mockServices.Aggregator.ConfigurationService.ManifoldMinimumFlushVolume = 0;
_mockServices.Aggregator.ConfigurationService.MacroMinimumPrimeVolume = 0;
_mockServices.Aggregator.ConfigurationService.MicroMinimumPrimeVolume = 0;

// Actions
var cut = new VolumeSettingsViewModel(_mockServices.Aggregator, _mockSettingsController.Object)
{
MacroMinimumFlushVolume = TestVolumeValue,
MicroMinimumFlushVolume = TestVolumeValue,
ManifoldMinimumFlushVolume = TestVolumeValue,
MacroMinimumPrimeVolume = TestVolumeValue,
MicroMinimumPrimeVolume = TestVolumeValue
};
cut.SaveChanges();

// Assertions
Assert.AreEqual(
_mockServices.Aggregator.ConfigurationService.MacroMinimumFlushVolume, cut.MacroMinimumFlushVolume);
Assert.AreEqual(
_mockServices.Aggregator.ConfigurationService.MicroMinimumFlushVolume, cut.MicroMinimumFlushVolume);
Assert.AreEqual(
_mockServices.Aggregator.ConfigurationService.ManifoldMinimumFlushVolume, cut.ManifoldMinimumFlushVolume);
Assert.AreEqual(
_mockServices.Aggregator.ConfigurationService.MacroMinimumPrimeVolume, cut.MacroMinimumPrimeVolume);
Assert.AreEqual(
_mockServices.Aggregator.ConfigurationService.MicroMinimumPrimeVolume, cut.MicroMinimumPrimeVolume);
}
This code should be fairly self explanatory, with the exception of maybe the moq specific code, but a quick look at the Moq QuickStart should clear up any confusion. Basically I have just setup the five properties on the ConfigurationService mock and then set a new value to each, then asserted that new value (set on the view model) on the service property. Note that the setup for the properties on the ConfigurationService only sets it so that any value set to that property will be returned by the mock. Kind of like saying, “Okay, setup this property with a get and set”. I also set all of the properties to a default value of 0.
So, now I have tested the underlying functionality of the view model’s link to the configuration service. What else is there to test?
3. If you remember from the listing of the VolumeSettingsViewModel you might remember that the volume properties have some validation attributes on them, and these happened to be tied to some more functionality from the BaseSettingsViewModel class that sets a HasErrors flag if the validation fails. So, that should probably be tested too.
a. There is a RangeValidator attribute on each volume property, from the Ent. Lib Validation Block which we use for validation of domain models.
We also use it for validation of applicable view model properties. There is in fact some builtin wiring that sets up the validation error messages for the user in the xaml as well. This is done using a custom control template for textboxes.
b. The range validator has an upper bound limit and a lower bound limit. I need to test both upper and lower, for each of the 5 volume properties. So ten tests in all, one for each situation, for each property.
Here is the code for those tests:
[TestMethod]
public void TestVolumeSettingsViewModelValidationLowerRangeMacroFlush()
{
    // Arrangements
    var testVolumeValue = Convert.ToDecimal(Constants.MinMacroFlushRange) - 1;
    SetupConfigurationServiceProperties();

    // Actions
    var cut = new VolumeSettingsViewModel(_mockServices.Aggregator, _mockSettingsController.Object)
        {
            MacroMinimumFlushVolume = testVolumeValue,
        };
    cut.Validate();

    // Assertions
    Assert.IsTrue(cut.HasErrors);
}

[TestMethod]
public void TestVolumeSettingsViewModelValidationLowerRangeMacroPrime()
{
    // Arrangements
    var testVolumeValue = Convert.ToDecimal(Constants.MinMacroPrimeRange) - 1;
    SetupConfigurationServiceProperties();

    // Actions
    var cut = new VolumeSettingsViewModel(_mockServices.Aggregator, _mockSettingsController.Object)
        {
            MacroMinimumPrimeVolume = testVolumeValue,
        };
    cut.Validate();

    // Assertions
    Assert.IsTrue(cut.HasErrors);
}

[TestMethod]
public void TestVolumeSettingsViewModelValidationLowerRangeManifoldFlush()
{
    // Arrangements
    var testVolumeValue = Convert.ToDecimal(Constants.MinManifoldFlushRange) - 1;
    SetupConfigurationServiceProperties();

    // Actions
    var cut = new VolumeSettingsViewModel(_mockServices.Aggregator, _mockSettingsController.Object)
        {
            ManifoldMinimumFlushVolume = testVolumeValue,
        };
    cut.Validate();

    // Assertions
    Assert.IsTrue(cut.HasErrors);
}

[TestMethod]
public void TestVolumeSettingsViewModelValidationLowerRangeMicroFlush()
{
    // Arrangements
    var testVolumeValue = Convert.ToDecimal(Constants.MinMicroFlushRange) - 1;
    SetupConfigurationServiceProperties();

    // Actions
    var cut = new VolumeSettingsViewModel(_mockServices.Aggregator, _mockSettingsController.Object)
        {
            MicroMinimumFlushVolume = testVolumeValue,
        };
    cut.Validate();

    // Assertions
    Assert.IsTrue(cut.HasErrors);
}

[TestMethod]
public void TestVolumeSettingsViewModelValidationLowerRangeMicroPrime()
{
    // Arrangements
    var testVolumeValue = Convert.ToDecimal(Constants.MinMicroPrimeRange) - 1;
    SetupConfigurationServiceProperties();

    // Actions
    var cut = new VolumeSettingsViewModel(_mockServices.Aggregator, _mockSettingsController.Object)
        {
            MicroMinimumPrimeVolume = testVolumeValue,
        };
    cut.Validate();

    // Assertions
    Assert.IsTrue(cut.HasErrors);
}

[TestMethod]
public void TestVolumeSettingsViewModelValidationUpperRangeMacroFlush()
{
    // Arrangements
    var testVolumeValue = Convert.ToDecimal(Constants.MaxMacroFlushRange) + 1;
    SetupConfigurationServiceProperties();

    // Actions
    var cut = new VolumeSettingsViewModel(_mockServices.Aggregator, _mockSettingsController.Object)
        {
            MacroMinimumFlushVolume = testVolumeValue,
        };
    cut.Validate();

    // Assertions
    Assert.IsTrue(cut.HasErrors);
}

[TestMethod]
public void TestVolumeSettingsViewModelValidationUpperRangeMacroPrime()
{
    // Arrangements
    var testVolumeValue = Convert.ToDecimal(Constants.MaxMacroPrimeRange) + 1;
    SetupConfigurationServiceProperties();

    // Actions
    var cut = new VolumeSettingsViewModel(_mockServices.Aggregator, _mockSettingsController.Object)
        {
            MacroMinimumPrimeVolume = testVolumeValue,
        };
    cut.Validate();

    // Assertions
    Assert.IsTrue(cut.HasErrors);
}

[TestMethod]
public void TestVolumeSettingsViewModelValidationUpperRangeManifoldFlush()
{
    // Arrangements
    var testVolumeValue = Convert.ToDecimal(Constants.MaxManifoldFlushRange) + 1;
    SetupConfigurationServiceProperties();

    // Actions
    var cut = new VolumeSettingsViewModel(_mockServices.Aggregator, _mockSettingsController.Object)
        {
            ManifoldMinimumFlushVolume = testVolumeValue,
        };
    cut.Validate();

    // Assertions
    Assert.IsTrue(cut.HasErrors);
}

[TestMethod]
public void TestVolumeSettingsViewModelValidationUpperRangeMicroFlush()
{
    // Arrangements
    var testVolumeValue = Convert.ToDecimal(Constants.MaxMicroFlushRange) + 1;
    SetupConfigurationServiceProperties();

    // Actions
    var cut = new VolumeSettingsViewModel(_mockServices.Aggregator, _mockSettingsController.Object)
        {
            MicroMinimumFlushVolume = testVolumeValue,
        };
    cut.Validate();

    // Assertions
    Assert.IsTrue(cut.HasErrors);
}
These tests are all very similar, varying only in which volume property is tested and whether testing the lower limit or the upper. Each test uses the constant value that is used in the actual RangeValidator and either adds or subtracts 1 to come up with a value that is outside the limits. Then that invalid value is set to the property on the view model. The validate method is called and then we assert that the HasErrors flag is correctly set showing the invalid value.
Summing Up…
Well, I guess that is a pretty good glimpse at what I went through to get these view models tested. I just wanted to provide some real world examples into how to come up with what unit tests to write for a view model. It is something that doesn’t come as easily for me as other unit testing and I have never really found a blow by blow set of examples like what I have hopefully provided here. In other words, I wish I would have found an article like this when I first started with PRISM and MVVM, that would have helped me with my unit testing.
Certainly nothing earth shattering, and in fact, these examples are pretty simple, but I wanted to convey the through process and the “on the ground” example of some unit testing for view models. I could go through the rest of the view models but as they are all settings view models, the subsequent test are all very similar, as is the process behind coming up with them.
I hope that this helps someone. And please offer some feedback if you have experience in this and can offer some insight. I am still very much looking to improve my unit testing process and technique and all input would be appreciated.
